Shadowrocket Setup Guide:
Import, Connect, and Verify Access
Add existing server details, then choose how traffic should be handled. After connecting, check both the test result and real-world access instead of relying on the switch status alone.
Add Server: Add a Server or Import a Subscription
A subscription link and individual server parameters are two different ways to add details. Choose the one that matches the information you have; there is no need to add the same details twice.
For an existing subscription link: choose Subscribe
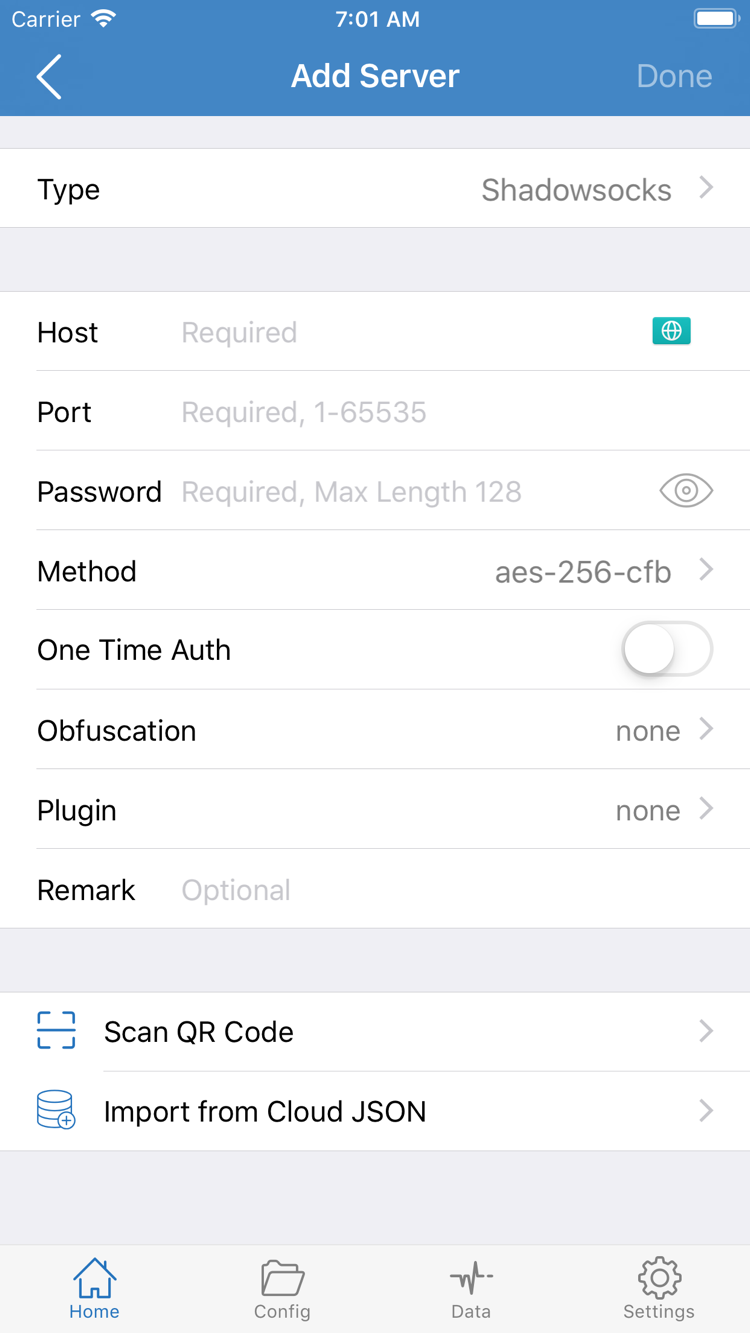
Open Home, tap the add control in the upper-right corner, or tap Add Server in the list to open the server editor. Tap Type, choose Subscribe, then paste the full existing subscription link into the URL field. After returning, check for extra spaces or line breaks, and make sure you have not copied any explanatory text along with the link. A name or note is only for identification, so enter one according to your own preferences.
Tap the save or done button in the upper-right corner to return to Home. If no server entries appear, use the action menu for the relevant subscription item to update it, then wait for the import to finish. A subscription item is a source for the list, not a connectable server by itself. Expand the relevant group and confirm it contains individual entries before continuing. If parsing fails, first check that the link is complete and that it returns subscription content rather than a login page or regular webpage.
For an individual server: enter details for its protocol
Open Add Server and choose the protocol specified in your details under Type, such as Shadowsocks. Enter Host, Port, and Password in order. For Shadowsocks, also check Method. If another protocol displays additional fields, enter them according to the information you have; do not reuse fields from a different protocol. The address field generally takes a hostname or IP address; do not add a webpage path yourself.
If your details are provided as a QR code, use Scan QR Code to import them and check the fields again before saving. Import from Cloud JSON is for data in the corresponding format; do not enter an ordinary subscription link there. When finished, return to Home and check the new entry's name and type in the SERVER group. The details are now saved, but a proxy connection has not started. Next, choose how traffic should be handled.
Subscription links, passwords, and QR codes may contain access credentials. Do not post their full contents in public forums. For format issues, see the FAQ; for the difference between Subscribe and configuration files, see the glossary.
Global Routing: Choose Config, Proxy, or Direct
The server determines where traffic goes; Global Routing determines how it is handled. These are separate settings.
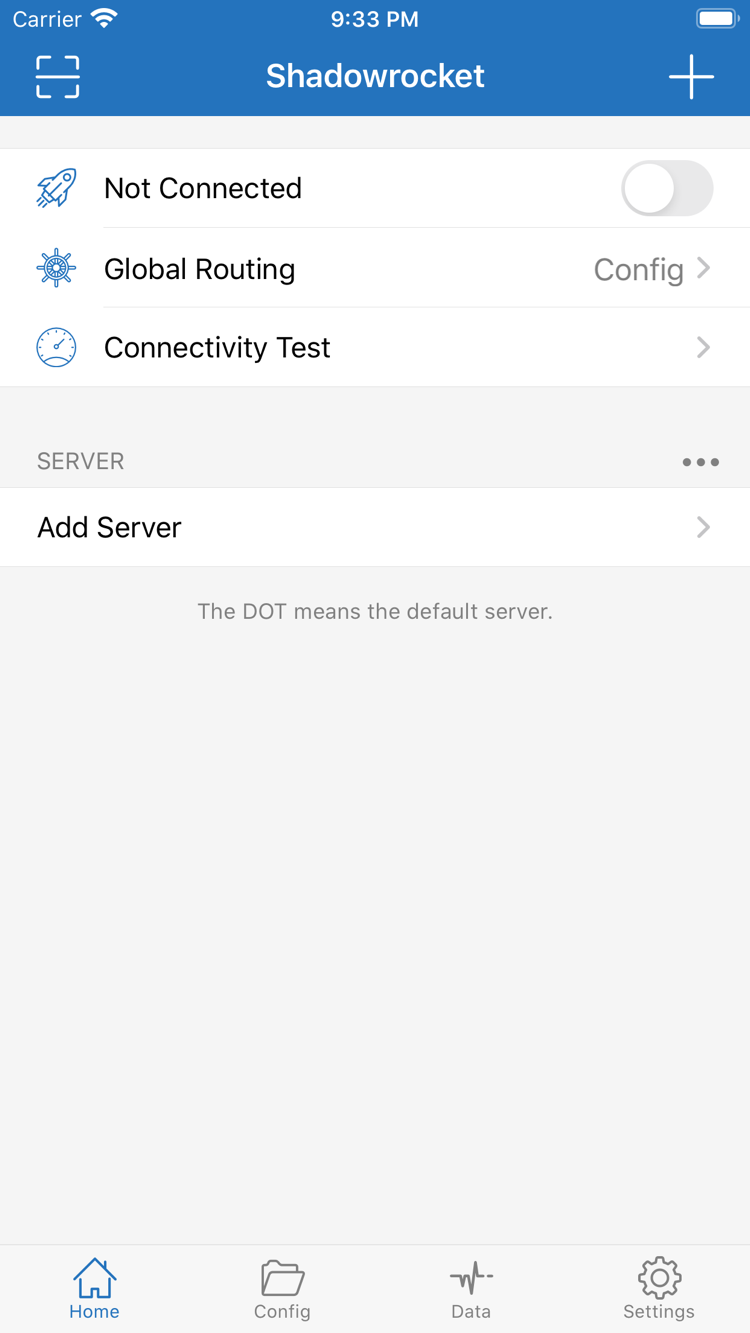
Return to Home and tap Global Routing to view the current mode. The three options are Config / Proxy / Direct. Do not choose by name alone: first decide whether you are setting up everyday use or temporarily checking server availability. After making a change, return to Home and confirm that the Global Routing row shows the updated mode.
Config: Apply the active configuration file
Config applies rules from the currently active configuration file. Open Config and check which file is in use, then review its Rule section. Matching rules use their corresponding policies: PROXY sends traffic to the proxy policy, DIRECT connects directly, and REJECT blocks it. Updating the server list does not mean that suitable routing rules have been downloaded and enabled.
You do not need to rewrite the entire configuration when getting started. First check whether the current file has the rules and fallback behavior you need. Keep the original file and understand it before making edits. General, Rule, Hosts, URL Rewrite, and HTTPS Decryption in the configuration screen serve different purposes. Basic connectivity does not require enabling or editing each one, and there is no need to change decryption settings just to get started.
Proxy and Direct: Use them for a clear comparison
Proxy handles traffic taken over by the client using the proxy mode. It can help temporarily check whether the current server supports the access you need, but results still depend on the system network and app behavior. Direct connects intercepted traffic directly without using the selected proxy server. It can help compare basic network access, but does not prove that the proxy server is working. After comparing, restore the mode you actually need.
Rules are usually matched from top to bottom; FINAL applies when no earlier rule matches. For example, the snippet below sends example.com and its subdomains through PROXY, while FINAL sends other requests to DIRECT. This is a syntax example, not a complete file to replace your current configuration with. For configuration structure, rule priority, and more rule types, see the configuration reference.
[Rule]
DOMAIN-SUFFIX,example.com,PROXY
FINAL,DIRECT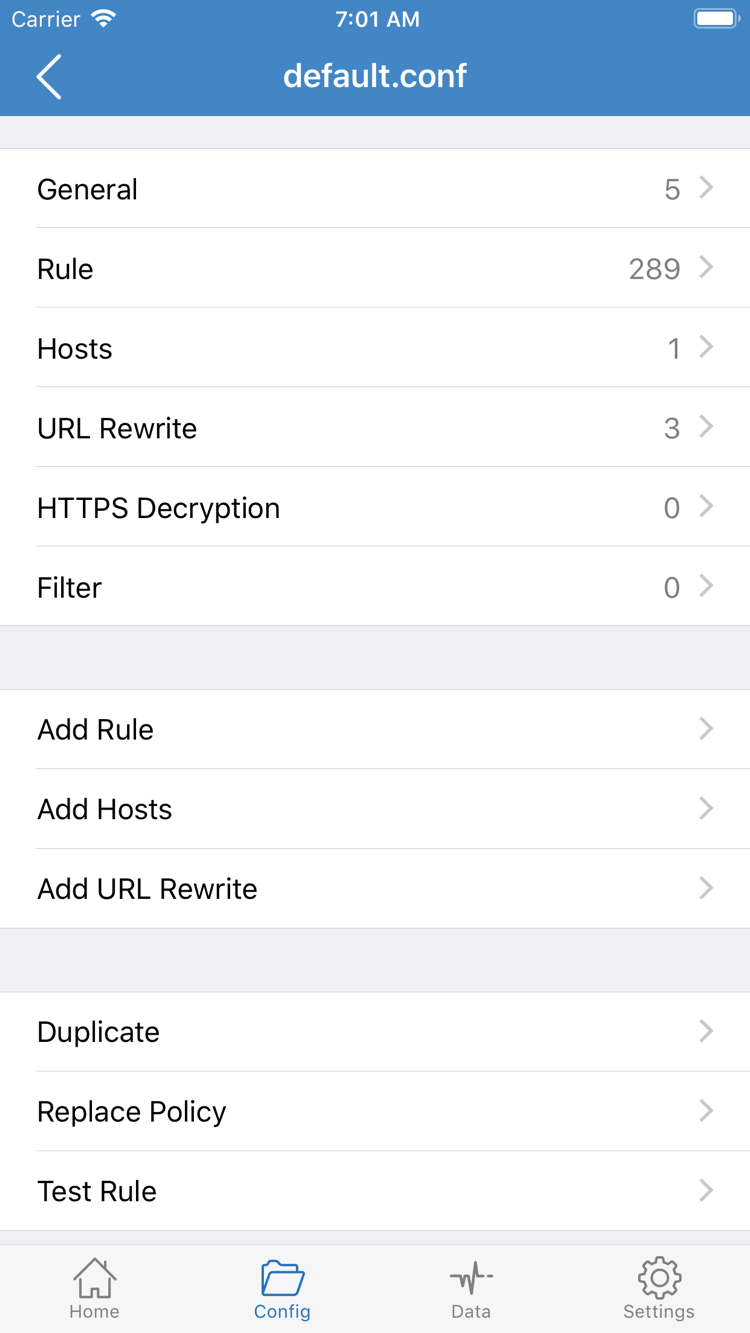
Home: Select a Server and Connect
Select an entry before connecting. First-time authorization lets the system create a VPN configuration.
Return to Home and select the server you intend to use in the SERVER group. Confirm that the selection indicator is on the intended entry. If there are multiple subscription groups, expand the correct one and select an individual server. Tapping the edit button is different from selecting an entry; if the parameter page opens, return to the home screen. Then check Global Routing again to make sure it was not left in Direct mode during troubleshooting.
Turn on the connection switch at the top of Home. The first time you connect, the system may ask for permission to add a VPN configuration. Review the app name and prompt, then confirm and authenticate as required by the system. This allows the system to create a VPN configuration on the device; it does not add a subscription or correct invalid server parameters. If you cancel, the switch may turn off when you return. Start the connection again and complete authorization.
Return to Shadowrocket and check whether the top of the screen still shows Not Connected. If the status changes to connected, the local connection process has started, but this does not mean the remote server, DNS, or every target website is working. Avoid toggling the switch repeatedly in quick succession. Wait for the current action to finish, then continue to verification so you can distinguish the result of each connection attempt.
If the system reports that another VPN connection is active, first check whether a system configuration is affecting routing; multiple connections may interfere with each other. Managed devices may require administrator approval. For initial troubleshooting, keep the current network unchanged. Do not switch between Wi-Fi and cellular while also changing protocol parameters. When finished, turn off the switch in Home and check that the system connection has ended.
Connectivity Test: Verify with Real-World Access
Connection status, test results, and target requests are three separate checks; none replaces the other two.
Run a test, then open the content you need
Tap Connectivity Test in Home and wait for the test to finish. Results depend on the Test Method in Settings and the test target. They can help determine whether the selected entry is reachable using that method, but cannot guarantee that every website will load. A single timeout is not enough to conclude that all servers are unavailable; compare other entries and actual access to narrow down the issue.
Next, switch to a browser and reload the page you intended to use. Check that the page text, images, and subsequent requests load correctly. Do not rely only on a cached homepage; reopen a specific content page to avoid mistaking a cache hit for current network access. If the browser works but an app does not, narrow the issue to that app and its requests rather than immediately deleting all subscriptions.
With Config, check the rules as well
Return to the app and review available connection or request records in Data. Check the target domain, matched rule, and applied policy. These records can help distinguish between “connected but using DIRECT” and “using PROXY but the request failed.” Do not infer rule behavior from the apparent exit location, or assume that one successful request means all traffic follows the same route.
To compare modes, keep the same server and network, temporarily switch to Proxy, then retry the same target. If Proxy works but Config does not, first check the active file and rule order. If both modes fail, first check the server parameters or basic network. After testing, restore the intended mode and note the reproducible behavior before continuing to troubleshoot.
Settings: Troubleshoot Common Issues
Change one item at a time and test the same target again. Keep notes that explain the difference before and after.
The list is empty or a subscription update fails
First check whether the device can access an ordinary webpage, then confirm that the subscription link is complete and still valid. If the service provider has changed the details, check the latest link you have rather than repeatedly adding the same entry. An existing server that works while updates fail is a different issue from all servers being unable to connect. Check them separately to avoid deleting entries that still work.
A single server times out or access fails after connecting
If only one server fails, first check its Host, Port, protocol type, and authentication parameters. Differences in domain spelling, port numbers, or Method can cause failures. Protocols with additional transport or TLS parameters require those fields to be checked as well. Then verify that the system date and time are correct. Do not hide parameter or time issues by disabling certificate verification at random.
If every entry fails, first compare behavior on Wi-Fi and cellular, then check system VPN authorization and other system settings that may affect connections. After switching networks, test again without changing server fields at the same time. If only some domains fail after connecting, return to Global Routing and Config to check the rules, and use request records to distinguish DNS issues, policy selection, and remote responses.
Check the test method, automatic connection, and diagnostics
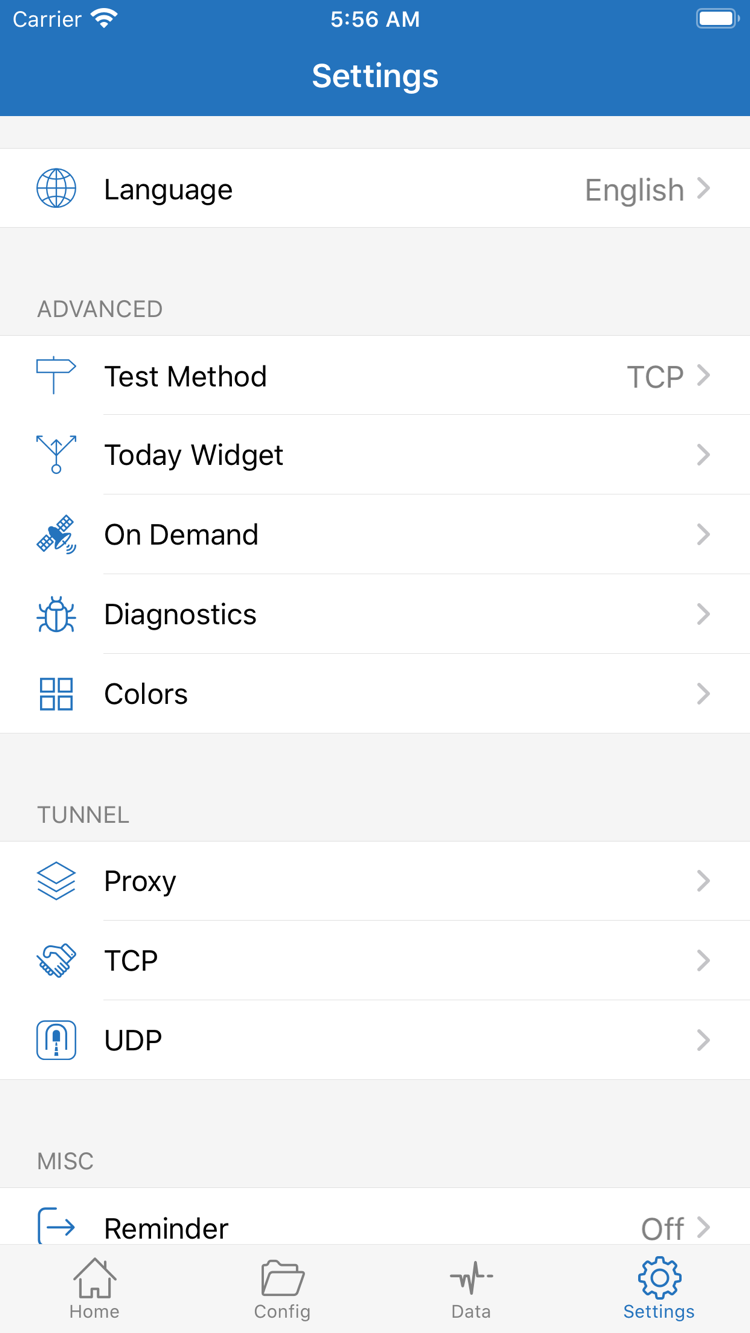
Open Settings and check the Test Method used by Connectivity Test. Avoid comparing results from different test methods directly. On Demand triggers connections based on conditions. If the connection turns back on after being switched off, check whether relevant conditions have been set. During initial manual testing, first determine whether any current conditions are active before deciding whether to change them.
For further diagnosis, review the available tools and records in Diagnostics. Note the network type, mode, and sequence of actions when the error occurs. Before sharing diagnostic information, hide subscription addresses, passwords, QR codes, and information that could identify you. There is no need to change Proxy, TCP, UDP, and other settings just to try them all; leave options unchanged if you are unsure what they do.
If the issue persists, follow the relevant checks in the FAQ for installation and connection issues. For field definitions, see the glossary; to change rules, read the configuration reference. Clear reproduction steps are more useful for diagnosis than changing several switches at once.